DIY Crackers for Christmas or New Year


DIY Crackers for New Year's Eve


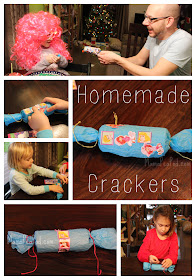
Remember how fun it was pulling Christmas crackers at dinner? Well, we had loads of fun making these homemade crackers last year to pull during our New Year's Eve celebrations with the kids! They were easy to make with just recycled materials and a few odds and ends to pop inside. 


homemade DIY christmas crackers for new years eve with kids

If you want to try these all you need are some paper rolls, leftover tissue paper, glue, and bits of string or ribbon. You might also want some stickers or whatever you have on hand to decorate with.

First, we got some empty paper roll tubes and cut them to about 5 inches long (one paper towel roll cut in half).

Using a pair of scissors, we cut along the diagonal line where the tube has a seam. We cut about two thirds of the way along the roll, following the seam, leaving just the last third intact. 

Then we cut some leftover tissue paper from gifts to about double the length of the tube and wide enough to wrap the tube in. After that, we reformed the tube back into its original shape and rolled the tube up in the paper. We sealed the edge lightly with some glue. 

Using bits of string and ribbon, we tied the tissue at one end. Then we filled the tube with a few small surprises*! Once it was filled, we tied the other end, too. 

Finally, we decorated the paper with more stickers (or you could use whatever you like - glitter glue to make it sparkle?)

When the time comes to pull the cracker, one person pulling each end will tear the tissue paper and the roll will fall open, spilling treats!

*When I asked the kids what they thought we should put in our crackers, they raced around the house gathering up small things that we already owned: hair clips, tiny figures, candy, dress-up jewelry, etc. They each picked some 'surprises' for the other one's cracker. It was so sweet to see how absolutely delighted they were to find out what the other one had surprised them with, even though it was something that was already theirs! However, some other suggestions to put inside might be:

* a joke printed on a tiny scroll of paper
* a Lego or Playmobil person
* a sprinkling of glitter, if you don't mind a bit of mess
* a wrapped chocolate
* enough loom bands, loose, to make a bracelet and/or a loom band charm
* a mini pack of cards
* glow sticks (you'll need to make sure you cut your roll long enough for these)
* lip balm
* a couple of crayons and a few sheets of small note paper rolled into a scroll
* temporary tattoos
* stickers
* a finger puppet
* some kind of nature treasure: a feather, a tiny pine cone, a walnut, a pretty stone, etc.

Enjoy!


Photobucket

{Rubbed Leaf Hedgehogs}


These cute little hedgehogs brightened up our dreary fall afternoon last weekend!


Rubbed Leaf Hedgehogs

Creativity for Preschoolers


rubbed leaf hedgehogs art for preschoolers collage

Sweet Pea loves collecting leaves, sticks, rocks, anything from nature that she finds on our walks. As a result, we had a large pile of leaves that she had collected and pressed and was looking for something to use them for.


child making leaf rubbings with crayons


After seeing these leaf turkeys and these leaf hedgehogs, we decided to make our own versions of hedgehogs with them. Sweet Pea is in the Hedgehog class at preschool, and our dog's name is Hedgehog (in Hungarian), so hedgehogs were the perfect subject for our crafty Sunday together!


child making hedgehog art from leaf rubbings

We got out some paper and drew some snouts - just a rounded, slightly curved triangle with a circular nose on the end. 


child using boya ergonomic crayons

Then we put leaves under the papers and rubbed them gently with the side of a crayon (we love these ergonomic crayons from Boya). 


hedgehog picture made from leaf rubbings

Aren't they sweet? I think our little Hedgehog approves!


red and yellow hedgehog made from leaf rubbings


Looking for more leaf-y activities? How about these?


Nature leaf garland

fall leaf wreath for kids to make


Simple fall nature art


Photobucket

{Recycled Sharpie Sun-Catchers}

Recycled Sharpie Sun-catchers


*This post was originally shared as a guest post on Skip to My Lou on July 31st, 2014.


We loved making these simple and colourful DIY sun-catchers out of materials from the recycling bin! They look just gorgeous hanging in a sunny window indoors or outdoors on the porch. I plan to move them to hang from our dining room light fixture in the winter months so we can still enjoy them without much sunlight.

We used plastic from an empty package of frozen mini quiches, but any plastic container with individual 'cup' sections would work just as well. In fact, even flat plastic would work, but the 'cups' make it easier to cut out circles.

First, cut out the circular bottoms from the 'cups' of the plastic packaging.


Next, draw colourful designs on them with permanent markers (we used these '80s Glam Sharpies' [affiliate link] and love the fun, summery colour combination!) 

Then poke a hole in each circle with a needle or hole punch (we like this ribbon hole punch [affiliate link]) and string onto some fishing line [affiliate link]. Tie a knot onto each one to keep them from sliding together when you hang them.


Then hang up where the light can shine through them! The pictures really don't do them justice - they are BEAUTIFUL!


Some suggestions for hanging:
  • *hang down in front of a window
  • *hang horizontally in front of a window as garland
  • *make several strings and hang them together as a mobile
  • *hang outdoors on your porch or deck
  • *hang indoors from a light fixture
  • *attach to the bottom of a lampshade and let them dangle
  • *hang around the frame of a mirror

If you're looking for more crafts ideas, check out our ARTS AND CRAFTS FOR KIDS and our TIME FOR MAMA sections!

Photobucket

{Easiest Sewing Project Ever: No Cut No Measure Table Runner Tutorial for Complete Beginners}

EASIEST SEWING PROJECT EVER:

TABLE RUNNER

Pin it! Easiest sewing project ever - a no cut, no sew table runner!
Oh my, I cannot believe how much I love this table runner and how incredibly easy it was to make! Seriously, there is absolutely nothing to it whatsoever! No cutting! No measuring! That's my kind of sewing project! 
:-)

I found these beautiful 'fat quarters' at our local hobby shop. All I did was select 3 coordinating fabrics and sew them together! (You can buy pre-matched coordinating fat quarter sets here [affiliate link].)

I am truly a complete beginner when it comes to sewing (or most anything domestic, really), so I get it - you still want a tutorial. So, here is exactly what I did:

Iron your fabrics nice and flat. Lay out your 3 fat quarters in a line, arranged in the order you like and be sure the patterns are all right-way up.


Lay out your table runner fabrics as you want them to look when finished


Take the left hand piece and fold it over the middle piece, so that the two pieces are facing right-side-in together. Sew along one edge (the edge where you want them to join, obviously, so select the edge that suits how you want them laid out in the end - if you folded over like I just said, that should be the left side), about 3/8 to 1/2 inch in from the edge of the fabric. Open out flat. Lay it back down with the third piece again. Take the third piece and fold it over the middle piece, so that the right sides are facing in together. Sew along the edge where you want them to join (this time it will be the right side if you folded as I said). Open out flat. Iron again so that the seams lie flat.


Sew your table runner fabrics together - so easy!


Fold the edges in as straight as you can (I just eyeballed it) and pin all the way around the entire runner. Sew a hem all the way around, about 1/4 to 3/8 inch in. Iron again so the seams lie flat.

That's it! Yay, you! You sewed something!


Photobucket

{DIY Galaxy Shirts}

DIY 'Galaxy' Shirts

Pin it! Kid-Made DIY Galaxy Shirts!


Kids and adults alike will enjoy showing off their DIY 'Galaxy' shirts - fun and simple wearable art for the whole family!

You will need: [all product links are affiliate links for your convenience]


Lay your shirts on a large garbage bag or tarp outside. Place a piece of cardboard or plastic inside the shirt, to prevent bleach and paint from seeping through to the back.

Scrunch the centre of the shirt and twist it tightly (if you want, you can secure it with an elastic, but it's not necessary).

Put some bleach in the spray bottle and spray it onto the front of the shirt. Then untwist and lay out to dry.


Spray painting fabric for galaxy shirts


Once dry, use the spray-on fabric paints to spray over the front of the shirt (keep the cardboard/plastic inside). We found that it's best to apply the spray paint liberally - we thought Sweet Pea, aged 4, was putting far too much on hers as it seemed too concentrated, but in the end hers turned out to be the brightest and prettiest!

Leave out to dry according to the directions on your fabric paint.

Then wear them in style and show off your coolness! (Thanks, Auntie K, for doing these with us!)

Still want to make more? Try these Sharpie Tie-Dye Shirts next! 


Photobucket


Don't miss a thing! 

{DIY Bubble Machine}

DIY BUBBLE MACHINE

Pin It! DIY Bubble Machine


These DIY bubble machines are easy and fun to make for endless foamy bubble fun this summer!

You will need: [affiliate links included for your convenience]

  • *styrofoam or plastic cups
  • *plastic food wrap
  • *bendy straws 
  • *tape in a pinch but preferably sticky tack or chewed gum ;-p
  • *dish soap or bubble solution
  • *toothpick
  • *elastic bands or hair elastics
  • *something sharp to poke holes in the cups (we used a corkscrew)


Materials needed to make a DIY bubble machine for kids


1. Poke a hole in the cups, about 1 - 2 cm above the base, that is just big enough for a straw. Be careful not to let the hole tear too big. (I think next time we'll try a hole punch - if you try that, let me know how it works!)

2. Poke the bent end of the straw through the hole so that the long end is on the outside of the cup, bent upwards. Use tape, sticky tack or even a piece of chewed gum to seal around the hole. (We used tape, but it did leak, so if you have sticky tack or gum I'd go with those.)


How to attach the straw for your DIY bubble machine for kids


3. Pour bubble mixture or water with a generous squirt of dish soap into the cup (if your cup is leaky, you might want to do this step after step 5 so as to avoid losing all your solution.)

4. Pull a piece of the plastic food wrap as tightly as you can over the top of the cup and secure with an elastic band or hair elastic.


Poking holes in the plastic wrap for your DIY bubble machine for kids


5. Use a toothpick to poke lots of tiny holes in the plastic wrap. (If you didn't yet put your bubble solution in, follow this step by taking off the wrap and adding it now, then reattaching the wrap, pulling tightly again.)

6. Blow into your straw and watch the bubbles foam out of your own homemade bubble machine! Fun!!


Blowing lots of bubbles at once with your homemade bubble machine!


*Note: Obviously, this is only suitable for children who are not going to suck on the straw - please use your parental judgement as to whether this activity is appropriate for your child. (I did it with my 7 year old and 4 year old with no doubts in my mind.)


Photobucket


{Crazy Hidden Colours Science Experiment for Kids}

Crazy Hidden Colours

Science Experiment for Kids


One of our favourite science experiments from our recent Rainbow Fairy Science Party was this 'Hidden Colours' Experiment. (You can read the story about how this experiment involved fairies here.) It's such a simple experiment and the girls just LOVED it - they could have spent all day on this one, trying every liquid in the house!

It's very simple, but it does require red cabbage powder. We got ours as part of this science kit [affiliate link] for kids, but you can also buy the red cabbage powder here [affiliate link], or make your own red cabbage dye (if you make your own, keep in mind that it doesn't keep fresh like the powder does.)


The first step is to mix a tiny amount of the red cabbage powder into a cup* of water. (Since we did this as part of our Fairy Science Party, we used special Fairy Water - which is glittery!) When I say tiny, I mean really tiny. Our science kit came with a teensy scoop that allowed us to measure out 0.3mL of it. Just put a tiny bit on the end of your smallest spoon and mix it in. 

*We used clear, empty yoghurt pots. As you can see in the photo, we used enough water to mostly fill a single-serving yoghurt pot.

The water will turn a beautiful purple colour.


Then pour the purple water into an ice-cube tray so that each compartment is about 3/4 filled (so that the sections don't run together.)


Next, gather up a selection of household liquids (ones that are safe for kids to handle, obviously.) We used apple juice, orange juice, liquid soap, cola, lemon juice, soda water, tap water, tea, tomato juice, milk, coffee, and vinegar.

Use a pipette [affiliate link], an old medicine dropper, or a squirt bottle [affiliate link] with a small nozzle hole to drop a few drops of each liquid into one of the ice cube compartments. Stir with a toothpick and watch what happens.


We found all sorts of beautiful colours hidden in our household liquids!

Then leave it to sit out a while and see what happens to the colours after some time.


This is actually a pH test of the liquids. Red cabbage is a known pH indicator. Depending on the acidity/alkalinity of the liquids, the purple water will change anywhere from green (very alkaline) to red (very acidic).

Tip: We found that the milk made an especially pretty opaque, lilac colour :-)


Photobucket

{Rainbow Fairy Science Birthday Party!}

Rainbow Magic Fairies

Science Adventure:


An Exciting, Colourful Birthday Party!


Rainbow Magic Fairy Science Birthday Party - cover image


Princess Pea turned 7 last week, and this year she really tested my creative party planning skills by requesting a 'Science Fairy' party! (Erm...sure, honey, I can do that!) So, I put on my party planning hat and set out creating a Rainbow Magic Fairies Science Adventure party! It needed to involve fairies, magic, science experiments, and plenty of colourful fun! Read on to see what we did to create this super-fun, super-colourful, crazy party!


Rainbow Magic Fairies


Her favourite books are the Rainbow Magic Fairies series [affiliate link]. If you don't know it, check it out, they're actually pretty good books if your child is into imagination and adventure. The stories are well-written and she also likes that there is a fairy with her name, her sister's name, and the names of pretty much all of her friends, too - there are over 100 books in the series, each named after a different fairy, so there's a good chance you can find one with your daughter's name, too. Although they are fairies (inherently traditionally 'girly' to some extent), the fairies themselves have a variety of interests, so something to match most any interest your children may have - be it animals or sports or dance, or whatever. I think they've really helped my 'girly-girl' to widen her horizons, and I appreciate them for that. 


+ Love of Science


That said, there are no 'science fairies' in the series, so I needed to get creative! Since science is her favourite subject at school, she really wanted to combine those two loves into one birthday party theme! (Eh...lucky me!)


girl wearing science goggles
My budding scientist :-)


= Rainbow Magic Fairies Science Adventure!


So, I put on my party planning hat, and set out creating a Rainbow Magic Fairies Science Adventure Party (whew, what a mouthful!) It needed to involve fairies, magic, science experiments, and lots of colourful fun! (While most of the experiments were done with household items, I did order this science kit [all product links in this post are affiliate links,] which gave us some special harder-to-get ingredients as well as 'professional' equipment such as test tubes and droppers. But mostly we used empty yoghurt pots and medium and small squeeze bottles.) 

I created a story to build the party around. In the series, the antagonists are Jack Frost and his band of dull-witted goblins, who always cause trouble by messing with the fairies' magical items that they use to control events in the human world. So in our story, Jack Frost was deliberately mixing up all the colours in Fairyland, which the fairies use to colour our world as we know it, and the fairies needed our help to sort out all the colours again. 

I'll share more about the details of the experiments in a series of shorter posts, but for now, here's a glimpse of how the party actually went. I don't, unfortunately, have pictures of all of the experiments they did, but here's an overview:


The Letter


The party started off with the girls receiving a letter:


"Dear friends,


What’s your favourite colour? Everyone has a favourite colour… Mine is green, like the grass and the leaves on the trees… But I also love yellow, like the sun and daffodils, pink like roses, blue like the sky…. in fact, I love all the colours of the rainbow! Just think how dull and boring the world would be without colours... 

Well, as it happens, that is exactly what the evil Jack Frost wants! The colours you see all around you in the human world are controlled by the fairies in Fairyland. But Jack Frost and his band of wicked goblins have mixed up all the colours in Fairyland, and now the fairies are all mixed up and confused! And if the fairies don’t get all their colours back and sorted out, pretty soon all the colours in the human world will disappear! 

The fairies in Fairyland are very worried and we are asking for your help… You will need to use your science skills, some science fairy magic, and your powers of observation (looking carefully) to help us sort out all the colours! Work together with your friends. Remember to record all your observations in your science notes so you can remember how to fix the colours. 

Thank you for always helping us! You are truly wonderful friends.


Yours sincerely, 

Fern, the Green Fairy"


The girls were then divided into small groups, each with an adult/helper. Each girl got a packet with the letter, the rest of the story including the directions for all the experiments, and science notes pages for each experiment if they chose to record their observations (some did, some didn't - my daughter took it very seriously, haha!) Then they each got a pair of science goggles to wear (we borrowed them from our science teacher friend), which they thought was really cool!


Magic Fairy Crystals


The first thing they had to do was mix up some Magic Fairy Crystals. 


"The Science Fairies have some SPECIAL FAIRY CRYSTALS that have magic powers. They have sent us some to give us temporary magic fairy powers, so that we can help the rainbow fairies to find all their colours."


magic fairy crystals (water beads)

Over the course of the party, the tiny magic crystals (which were really water beads) grew bigger and bigger and they had fun playing with them at the end.


Fairy Waterfall


Next, they had to help find the colours in the Fairy Waterfall:


"In Fairyland, there is the most beautiful, crystal clear waterfall that flows into a lake with a rainbow volcano in the middle! Unfortunately, Jack Frost has turned all the water in the waterfall and lake purple!"


girls doing science experiments

science experiment red cabbage
Fairy Waterfall Experiment


Hidden Colours


"Jack Frost has cleverly hidden colours all around us so the fairies won’t find them! See what colours you can find hidden in these everyday liquids."


household liquids for testing acidity


hidden colours experiment for kids (testing acidity)
Hidden Colours Experiment

[Read all about how we did the Hidden Colours Experiment here.]


Test Your Fairy Powers

 "Have you been checking your magic fairy crystals? Are your magic fairy powers working yet? Let’s test them and see…"

They did a cool surface tension experiment to see if their fairy powers (that they'd gotten from the Magic Fairy Crystals, of course) had kicked in yet.


Magic Milk


Now that their fairy powers were working, they were ready to make some magic!


"Now that your magic fairy powers are working, you can make some colours come alive."

girls doing magic milk experiment
 Magic Milk Experiment 

Make A Boat


They had to put their understanding of basic physics to work with the next activity. 


"Make a boat to help the fairies float across the fairy lake to where Jack Frost and the goblins are hiding. Choose whatever materials here you think will help you. Then test your boat to see if it floats."

whatever floats your boat - making boats out of recyclables
Boat Building

Rainbow Volcano


Their final experiment involved lots of colourful, fizzing fun!

"Lookout! The Fairyland rainbow volcano is about to erupt! Hopefully it will help us to get back some more colours!"

rainbow volcano baking soda and vinegar experiment
Rainbow Volcano Experiment

Rainbow Blast


The grand finale was blasting Jack Frost and his wicked goblins right out of Fairyland with this Rainbow Blast experiment (otherwise known as elephant toothpaste!) We used a slightly stronger concentration of ingredients to make it really blast out.

flasks of coloured liquids for science experiment

elephant toothpaste experiment
Rainbow Blast Experiment


And finally, the girls had fun mixing up their own magic potions and eating some rainbow snacks! 


girls science experiment mixing potions
Mixing Potions


rainbow jello cups for party food
Rainbow jello cup snacks


rainbow magic fairies birthday cake
Rainbow Magic Fairies Birthday Cake
(made by my incredibly talented friend, Masha)


Some party planning notes:


Since the experiments required a lot of set-up, I decided to forego fancy party food and just order pizza instead - plus some fruit/veggie plates and rainbow jello cups. (Can't have a rainbow party without rainbow jello, right?)

I recruited a 13 year old helper to take one of the groups so that each group would have an 'adult' to help them with the experiment directions. We also made it more manageable by only inviting a few friends.

We held the party outdoors, but even so I wanted to minimize the mess as much as possible, so each experiment was set up on a tray or in a large baking dish. It worked well at containing the mess, and the clean up was really easy.

The girls each took home their story/experiment packet (with explanations of what all the 'magical' ingredients really are, in case they want to do them again at home), their boats they had built, and a Rainbow Magic Fairies book as their party favour.

We ordered this fairy-themed party set.


happy birthday girl 7 years old
A happy birthday girl!


Photobucket

All product links in this post are affiliate links. By clicking these links, at no extra cost to you, we get a small percentage of the sales cost in exchange for advertising the products from Amazon.com.